Search This Blog

Amazon Store

Translate

Follow this blog with bloglovin

Follow on Bloglovin

Sunday, December 18, 2011

Sequin Art


Ok, I promised you something sparkly a while ago and here it is. You're going to need:

 some styrofoam, a thin fabric or paper (I like black), sequin pins-I used head pins and don't really recommend them for this project, last but not least some nice SPARKLY SEQUINS. Optional Supplies include a strong magnet, ziploc bag, or container, and a safety pin (if you decide not to listen to me and use head pins).


Oh, that's right, you also need a sharpie, a template (in my case a fish), for kids I recommend you do a simple shape such as a star or a heart.

scrap of styrofoam
1. Take your piece of styrofoam

measuring how much I need, see my markings

and check how much you need for your picture, by laying out your template on top of the styrofoam

2. Next I measured how much fabric (can even use scrapbooking paper for covering) I needed to cover the styrofoam and made sure to leave enough to be able to glue it on the back.

Checking how much covering I need

3. Cut it and use a strong adhesive to glue it down, I used Elmer's Spray Glue Adhesive-only because I had it left over from a previous project.


bad pic of me gluing it up

better pic of me gluing it up
all done, looks nice

4. Now take your template, or freehand a drawing of your choice with your sharpie (mine ended up being a combination of freehand and template.
tracing

all done
all done, less light in this pic, because I wasn't sure which one would show up the sharpie better
5. Now, for the fun and tedious part, if you were stubborn and didn't listen to me and tried to use headpins, this is where the safety pin comes in. You will need to help the headpin by creating a hole using the safety pin for the headpin to go through. If you did listen to me, you should be able to skip this step.

safety-pinning the eye of the fish
holding the sequin in place, while I fish around for a headpin
(pun was unintended)

6. Using your sequin pins, put your pin through the hole in the sequin and push into the desired location in the styrofoam block.


I started with the eye of the fish and you can just do a bunch of these & have flowers

Here is it throughout it's creation and yep should have gone with something simple.
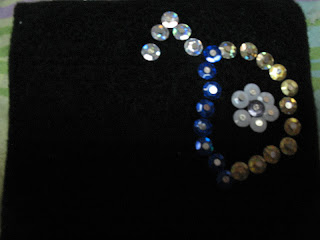


 REQUIRED SUPPLIES:
Styrofoam
thin fabric or paper
sequin pins
sparkly sequins
strong glue (NOT HOT GLUE-it will melt the styrofoam)
Sharpie


 What to do with those optional supplies:
What you never dropped a pin on the floor?

That's what strong magnets are for, they're for picking up pins that fall


Why do I need a ziploc bag or container?

Sequins as well as sequin pins have a tendency to escape, we'll try to contain them in the ziploc bag or container, especially as this project may take a few days to complete.

I've got tons of sequins left over, what can I do with them?

They have other fun styrofoam stuff, you can take one of those styrofoam balls and stick sequins in all over and you'll have a sparkly decoration. Or, (quick disclaimer: haven't tried this) you can carve out your own shape, 3d bear or something and stick in sequins all over, or repeat this project with your child's name or initial


Have Fun


 Linking Up At:

 http://www.iheartnaptime.net/


Monday, November 21, 2011

Fun with Google

http://mrdoob.com/projects/chromeexperiments/google_gravity/

Play around with it, then enter any search term and play some more.

then google- askew

Do you know any other Google tricks?

Saturday, November 19, 2011

Battle at Kruger

I found this video fascinating. My professor showed it to us in class. He described it like a disney movie, it has a happy ending. 


Here's the wikipedia page on this http://en.wikipedia.org/wiki/Battle_at_Kruger

Tuesday, November 15, 2011

Secret Ingredient Chocolate Chip Cookies

(Source for this Pic: Here)

See that picture, it's not mine, I took it from the the blog where I got the recipe from. I made some and while they went pretty fast, they didn't come out so nice and delicious looking.

Now here's something that I didn't quite get the results I hoped for.

Here was the promise: Using this SECRET ingredient results in chewy, fluffy chocolate chip cookies.  Now, that's just the way I like my cookies.

Your wondering what this secret ingredient was?

Wait for it................................................................................................Wait for it....................................

And the secret ingredient is CORNSTARCH.

I've been using my mother's recipe for chocolate chip cookies and those are awesome, so I decided to try these to be adventurous and see what would happen. I conveniently forgot that I do not like making cookies, because it takes me forever to scoop out the balls, or if I double the batch because they go so fast, I get overwhelmed with all the cookies to make. (Now it is quite possible that the previous sentence is a run-on sentence-I don't care right now). If you hate your current recipe, give these a try. I do not think that this was emphasized in the original recipe, THESE COOKIES DO NOT SPREAD. I'm not shouting, jut want to make the point. I used the cookie scoop and ended up with ball shaped cookies, not quite what I wanted. I flattened them out by hand with the last batch, but left them in the oven a drop too long, so they were a tiny bit on the tough side, but still plenty edible. I did substitute margarine for the butter because I wanted non dairy cookies.  Really, Really do not cook  longer than the recipe says, these cookies turn more tough than crispy. For some reason, some of these tasted like they needed to be mixed better and others tasted ok and this was a with a KitchenAid. It's also quite possible that my expectations are quite high. There was this one kid in my class, whose mother used to make her chocolate chip cookies for snack everyday and she shared them with the rest of the class. They were delicious and perfect in every aspect for the chewy cookie lover. My mother made cookies too, but she's on the other side of the fence on this one, she likes crispy cookies and that was the way she made them. When I made them, I made them soft.

I'm sharing this recipe, because it seems that many other people have had better success with the recipe. It also seems as if I identified my mistake. In my opinion these were good, but I've definitely had tastier chocolate chip cookies. So go ahead, try it out, let me know your opinion(s) (believe me I know some people got a lot to say) or your favorite cookie bar recipe (since I don't like doing cookies) I especially like unusual or different, as well as easy, you get bonus points if the recipe doesn't include evaporated milk or condensed milk. Why? Because I feel like it.

Here's the recipe for the Chewy Chocolate Chip Cookies with Secret Ingredient:
(My Source For This Recipe Can Be Found: Here)


Ingredients: 
3/4 c. unsalted butter, softened 
3/4 c. brown sugar 
1/4 c. granulated sugar 
1 egg 
2 tsp. vanilla extract 
2 c. all purpose flour 
2 tsp. cornstarch 
1 tsp. baking soda 
1/2 tsp. salt 
1 c. bittersweet chocolate chips

Directions:
1.  Preheat oven to 350 degrees F.

2.  In the bowl of a stand mixer fitted with a paddle attachment, cream together butter and sugars until fluffy and light in color. Add egg and vanilla and blend in.

3.  Mix in flour, cornstarch, baking soda and salt. Stir in chocolate chunks.

4.  Using a standard-sized cookie scoop or tablespoon, drop dough onto a prepared baking sheet.  Bake for 8-10 minutes, until barely golden brown around the edges.  (The tops will not brown, but do NOT cook longer than ten minutes.)

5.  Let cool, on the sheet, on a wire rack for five minutes.  Remove from baking sheet and let cool completely.  Try not to eat them all.

Stay tuned for something fun, and something sparkly coming your way.

Linking Up At:


http://womenwhodoitall.blogspot.com/

http://savvysouthernstyle.blogspot.com/


Stay tuned for something fun, and something sparkly coming your way. 

Monday, November 7, 2011

Crispy Chicken Sandwich

This recipe tastes great and is so easy, especially when you have leftover chicken cutlets. Chicken cutlets breaded with cornflakes are really good and will get you the crispy part of this sandwich, but any form of breaded cutlet works.

Ingredients:
Baguette
Breaded Chicken Cutlet (already cooked)
Mayonnaise
KC Masterpiece BBQ Sauce (it has to be this brand)

Optional:
Lettuce
Tomato
Onion

1. Spread a thin layer of mayonnaise on your baguette.
2. Place lettuce, tomato, onion on your baguette.
3. Put your chicken cutlet on the baguette
4. Drizzle BBQ sauce over the chicken cutlet.

That's it, really easy and delicious.

More options:
You can play around with other types of flavorings, by just changing the sauce you use, for example a spicy tomato dip in place of the BBQ sauce will give you a different type of sandwich.

Monday, October 17, 2011

Sunday, October 9, 2011

Maker Faire

I've been remiss in posting for a while and with the holidays coming up, it's not going to get much better for a while. This post was actually supposed to go up a while ago, but I wanted to add more pictures to it, oh well.

I had an awesome time at Maker Faire a few weeks ago. For those people unfamiliar with Maker Faire-check out their website to get a small idea of what they are all about. One was able to learn how to solder, pick locks, make a pinata or a marshmallow shooter. These were only some of the cool stuff going on at Maker Faire. One was able to learn knitting, crocheting, needle point, and/or cross stitch. My needlepoint and my crocheting are coming along nicely. Admission to Maker Faire also included admission to the NY Hall of Science which is in itself a great place.

This fire breathing dragon was an interactive piece of art,
 that kids loved climbing on.

inside of teardrop sculpture at night-gorgeous
Check here for more awesome pics of the events and hopefully one day, I'll post the rest of my pics.


Follow this blog with bloglovin

Follow on Bloglovin
Related Posts Plugin for WordPress, Blogger...